Updated October 13, 2026
The rule of thirds is when you divide the image up into thirds both vertically and horizontally using two lines, and place the most interesting parts of your photograph where those lines cross. It is one of the easiest ways to make your photos better. I’m Katie Donnelly, a Paris photographer, and this is part of my Authentic Portrait series of photography tips for parents.
What You’ll Find in This Blog:
What Is the Rule of Thirds?
One of the most common composition methods to start using is the rule of thirds.
Instead of plopping your subject riiigghhttt in the middle for every photo, try putting the most interesting parts of your photograph on the little intersecting lines after figuratively cutting the photo up into the 9 sections.
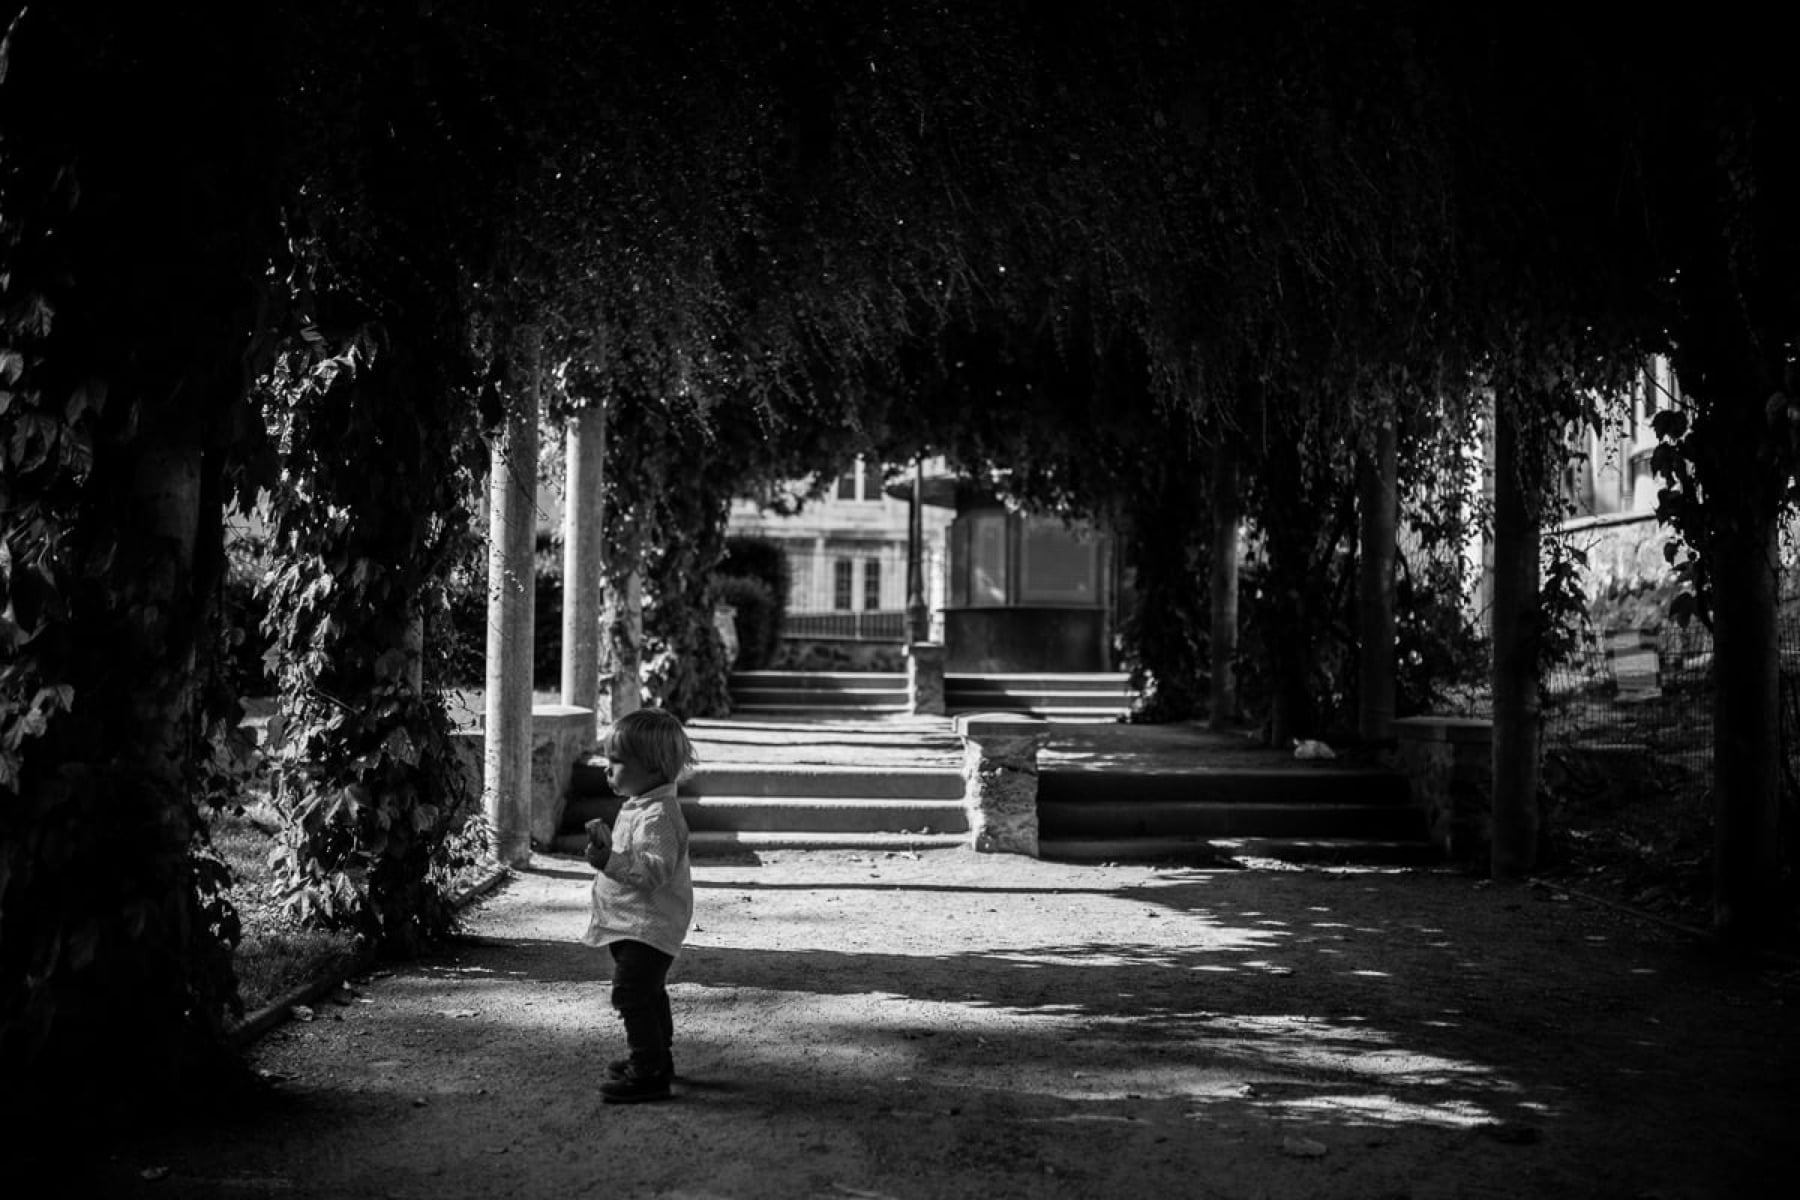
1/1600 sec at f / 1.8, ISO 200
In the photo above, the child is standing on the left third of the frame, not in the middle. The empty space on the right gives your eye somewhere to travel, and the photo tells more of a story.
How to Use the Rule of Thirds Grid on Your Camera or iPhone
Most cameras out there (iPhone included) have an ability to overlay a grid to make the rule of thirds easier. Try it out for yourself!
- Turn on the grid in your camera or phone settings.
- Place your subject on one of the four points where the lines cross.
- For portraits, try putting the eyes along the top line.
- For landscapes, put the horizon on the top or bottom line, not through the middle.
When to Break the Rule of Thirds
It is a starting point, not a law. Centering your subject can work beautifully when the scene is symmetrical. Learn the rule first, then bend it on purpose.
This lesson is part of The Authentic Portrait: A Parent’s Guide to Documenting Childhood, my photography guide for parents who want to learn the basics and take better photos of their kids, without spending hours and hours taking classes. I am working on a new edition of the guide. Until it is ready, you can read every lesson in The Authentic Portrait series.
Next lessons: the basics of composition and framing, common photo mistakes and how to fix them, and what is aperture. New to all of this? Start with the ultimate beginner’s guide to portrait photography.
Always the one behind the camera?
Hand it over for a morning. Our English-speaking team photographs families in Paris, so you are in the photos too. Sessions start at €150, and you see your photos the same day in our Saint-Germain studio.
Or first see how a Paris photoshoot with us works.
Rule of Thirds Questions
The rule of thirds divides your image into nine equal sections using two vertical and two horizontal lines. You place the most interesting parts of the photo on the lines or where they cross, instead of in the center.
Most cameras, iPhones included, can overlay a grid on the screen. Look for Grid in your camera settings.
Yes. Placing your subject to one side of the frame, with their eyes near the top line, makes a portrait more interesting than placing them in the middle every time.
No. It is a guideline. Once you are comfortable with it, break it on purpose when a centered photo is stronger.

About the author
Katie Donnelly, Paris Photographer
Katie Donnelly is an American photographer who opened her Paris studio in 2013 and was voted Best Portrait Photographer in Paris in 2017. She and her English-speaking team photograph families, couples and solo travelers at sunrise, so visitors go home with relaxed, real portraits instead of rushed selfies. Meet Katie and the team.
Ready to Book Your Paris Photoshoot?
You take the everyday photos. Let us take the ones with you in them.
- When: Mornings, just after sunrise, when the city is quiet
- Who: Families, couples, engagements and proposals, and solo travelers, with an English-speaking team
- Your photos: Viewed the same day at our studio in Saint-Germain-des-Prés
- Session fee: From €150. Inquire for our full price list.
Tell us your dates and we will help you plan the rest.
Or first see how a Paris photoshoot with us works.