Apple has revolutionized the way we live. What’s the first thing you do each morning? Me? First thing I do when I wake up is grab my iPhone (and check my email/scroll through Instagram/waste time
procrastinating the removal of myself from my incredibly warm comfy bed. Bad Katie.)
The best part about having an iPhone (other than having an easy procrastination buddy!) is THE CAMERA!
I cannot freaking live without this amazing little camera in my pocket.
No need to lug anything else around in your already oversized and way-too-heavy purse, Katie, iPhone’s got your back.
Thanks Steve Jobs.
Have you seen the ad campaign “Shot on iPhone” where you have these STUNNING photos of landscapes, portraits, and everything else beautiful under the sun? It’s incredible.
And then, of course, because we live in a world of hysterical online trolls, there was the other campaign “Shot on iPhone” that portrayed terrible mirror selfies, blurry drunk photos and other catastrophes that no one wants to relive. It’s the perfect counter campaign and it’s a great intro to what we are going to be talking about here in this course: How to make iPhone photos that fit in that first stunning beautiful campaign, and not the ridiculous, yet terrible second.
If you want to see these two campaigns, head here. The parody campaign is truly hysterical:
http://mashable.com/2015/03/25/also-shot-on-iphone-6/#8C4ZU83W1sq2
To get started, let’s talk about how this works and why it’s important to your life:
I’m going to break down the basics of photographing using an iPhone into small, bite-sized sections so it’s easy to digest and immediately implement. This is going to be hugely worthwhile to you because numero uno, it’s ALL FREE!! I want you to be able to use that handy gadget in your pocket easily, because most of us (myself included) have our last 4-6 YEARS of life documented with it. Yes, I’m sure you bring out your fancy camera for your travels and big events, but most likely it’s not as easy for you to use as your iPhone. I’ll be the first to admit that I don’t bring my professional camera out during my entire vacations, AND I’M A PHOTOGRAPHER. And it’s because I have Mr. iPhone as my sidekick.
So, let’s start with the veerrrrryyyyyy basics (drumroll please!)
-
Make Sure Your Lens is Clean!!
Before we take any photos let’s talk about the importance of cleaning your lens. Our phones are CONSTANTLY in our hands. This means they’re picking up the oils on our face when we are talking, they’re picking up the dirt on our hands when we are holding them, and (shout out to you parents out there!) baby slobber when they are in our kid’s mouths.
They’re filthy.
Before you head off disgusted to disinfect your phone right about now, remember to clean the BACK part where your lens is too.
Before I take any photos I ALWAYS breath a little onto the iPhone lens (Nintendo 64 – style) and rub it onto my shirt to clean off any oils/other undesirables to make my photos extra crisp. It’s the easiest habit to get into and is incredibly useful. Footnote: I ONLY clean my iPhone lens like this and never ever ever EVER my big camera lenses like this. For those I use real lens tissues (usually the ones that come with my sunglasses) and NEVER my shirt.
Now that it’s clean, we are ready for the show! It’s time to open the camera app.
2. Opening the Camera Up More Quickly Using the Top Swipe
There’s a shortcut for quicker access to your camera! At any time, with any app open, you can simply swipe up from the top right of your screen and boom chicka boom the camera icon is right there for you to click on on the bottom right. You can take photos with your iPhone locked even EASIER. When your phone is locked simply click the camera photo bottom right hand side of your screen. Think of it like a trap door for your camera. Easy access in the good way.
3. How to Focus
While we are in the camera mode let’s talk about how to actually FOCUS on your subject. Say your subject is the Eiffel Tower (howdy gorgeous!) or the Palais de Luxembourg in Paris (per below): to make sure your camera is focusing on her and not the building in front, tap directly on her. This will tell the camera, “Hey dude, this is what I want to focus on AND what I want to expose for.

Expose?
Yes, exposure. To put in the simplest terms, exposure is how much light is coming into your camera. If it’s too bright/letting in too much light that means it’s overexposed. If it’s too dark/not letting in enough light that means it’s underexposed.
So you want to tell the camera, by tapping on your screen, that your subject should be perfectly exposed. Here is an example of overexposure, perfect exposure and underexposure.
OVEREXPOSED

EXPOSED CORRECTLY

UNDEREXPOSED
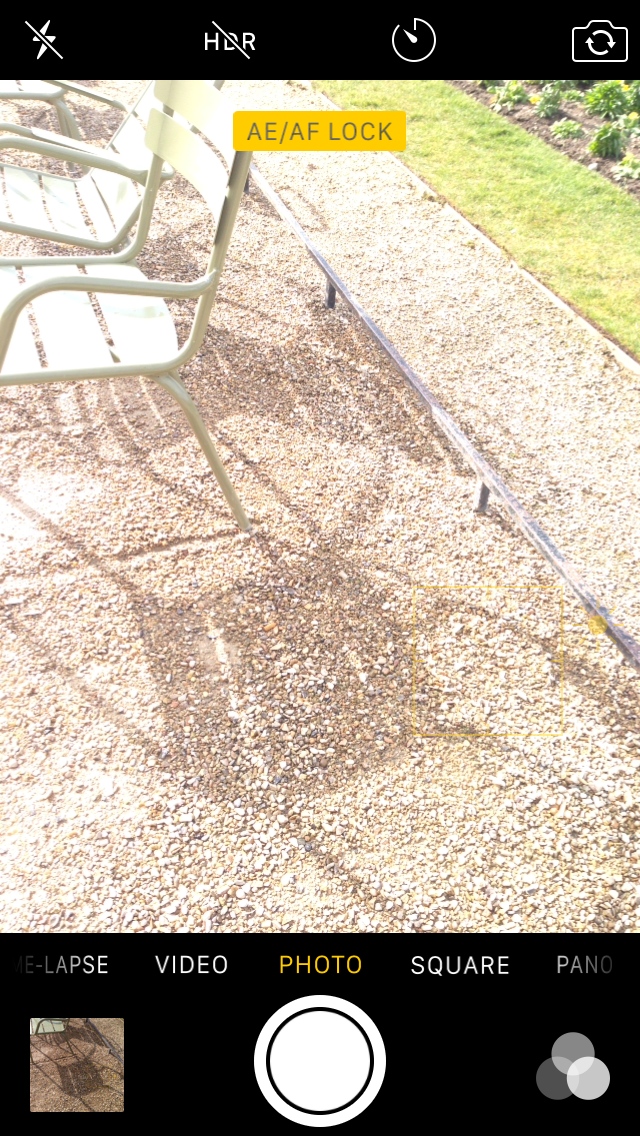
4. Using the Exposure Meter to Brighten/Darken Your Photos
Say for example that the phone isn’t listening to you (which happens, damn you technology!), and your screen is still showing that the photo is going to be too dark or not bright enough for your liking. While you’re still in camera mode about to take a photo, use your finger tap your subject on the screen, then hold your finger down and slide it up and down on the screen, you can increase or decrease the exposure meter thus making the photo darker/brighter.
Life changing right?
When I stumbled upon this trick my mind exploded into about a thousand and two pieces. (Kidding, but in all seriousness this is SO helpful!)
5. Shooting in Burst Mode
Situation: You’re in Paris, on vacation and in front of THE PERFECT Parisian street. You see the scene and think, “This needs to be photographed and plastered all over my Instagram and then printed for my wall.” EXCEPT it’s just the street (borrrrrrrriiiinnnnggggg) and you’re looking for more interest; a bit of movement, something to really show the feeling of Paris. Then the universe sends you a gift: someone on a bike rides by (thanks, universe!). You want to take a bunch of shots while she rides by and then pick the best afterwards.
By the way, this could apply to a million different situations: your kid’s running around, you’re at a soccer game, you’re out iceskating etc.
Your best option is to use burst mode to capture this perfect moment. To do this, simply swipe the shutter button to your LEFT and the counter will show you how many photos were taken. Your iPhone will take photos until you lift your finger up. So simple and so effective.
To then choose your favorite photo or photos that you’d like to keep out of this “burst”, tap the burst thumbnail and then tap “select”. Tap the circle in the lower-right hand corner of each of your fav photos and then tap “done”. EASY PEASY
What we’ll be covering in the next module is MAKING a good photo. (I promise it’s easy with your handy dandy sidekick, your iPhone!)
Let’s go >>